Showing posts with label sunburst mirrors. Show all posts

Friday, March 25, 2011

No Turning Back

A few days ago I read a blog by Bev at flamingotoes . She had posted about a starburst mirror for her dining room. Well, we all know I love my sunburst mirror I made for my bedroom. Well when I saw Bev's, I had to have one...isn't it pretty?? Good job Bev!


Flamingo Toes
 Well, what this girl likes, this girl makes...so I went about gathering supplies...I thought this would be sooo easy...hit a few thrift stores, gather up a few spoons, knives, forks..what could be easier?? Well, let me tell you...I had a hell of a time trouble!

I hit my favorite junk store first (Class n' Trash on South Main St)...there I found a crap load lots of butter-knives. I had to spread them all out to find a few that matched


Luckily they know me there so it wasn't a big deal to take over the floor like that (thanks Diane & Mike). I ended up with these..pretty nice, huh?


The amazing thing (at least to me) was that their spoon & fork collection was nonexistent less than impressive. I think there were a few random forks (half of which were plastic) and maybe a random spoon..yes, that's spoon, as in singular! Aye, now what? Off to the Salvation Army...OMG! are you serious, all they had was ONE fork...yeah, ONE!! (Side note, I did find some clear contact paper for another project..YAY!) So anyway, what the heck is going on here?? So then I said Goodwill will solve my problem..nope! Savers..oh, no, not them either! I found a few forks at Yellow Brick Road in Carmel, but other than that...NOTHING! This was turning into a FAIL...In the end, Grandma saved me again. She let me pilfer her utensil supply..woo hoo, hooray, for grandmas!!

So now that I had all my utensils ready..I cut out my cardboard circles...I went the "el cheapo" route like Bev did..I figured, if it worked for her, it would work for me! Silly naive girl!


Bev & I both cut out two circles and hot glued them together. I also added masking tape around the edges, so that the edges would look cleaner.

Next I had to choose a layout for my utensils


I numbered them so that when I took them off, I'd know which order they went in..I'm a control freak smart like that. (but not smart enough to wash them before putting the tape on...yeah, tape comes off in water..duh!)

Anyway, once you figure out what pattern you like..start hot gluing them down...


and when you're done with that...add more glue..no, no...way more than that! We're talking MEGA glue!


Nice, huh? Yeah, I know..it looks yucky, but it won't for long....

Now, here's where I deviated from Bev's startburst design. Instead of putting a plate and mirror in the center, I wanted a monogram. After reading House of Hepworths 's blog and seeing all her wonderful "H" monograms, I realized that my new initial (the very wonderful Z) didn't get its fair share of the spotlight, so I wanted a white Z on a black background...

I printed out the Z I wanted from my computer and made a stencil


I printed it out on cardstock & taped the back of the paper with masking tape to make it a bit sturdier


All I had to do know was put the stencil over my painted wooden circle & paint over it with white paint


Now if you're impatient like me, the paint will smear when you lift off the stencil..I suggest you wait until the paint is dry. Learn from me people...

This is what it looked like when it finally dried


I sealed it with Mod Podge


Those lines dry clear, no worries.
 I placed my monogram on the utensils and got ready to glue it down. It should have looked like this


Did you notice I used the word should? Well, that's because it didn't work. The utensils had stayed glued at different heights so it was an uneven surface. After thinking on it a bit, I channeled MacGyver and came up with the idea to cut out an inner circle to even things out.
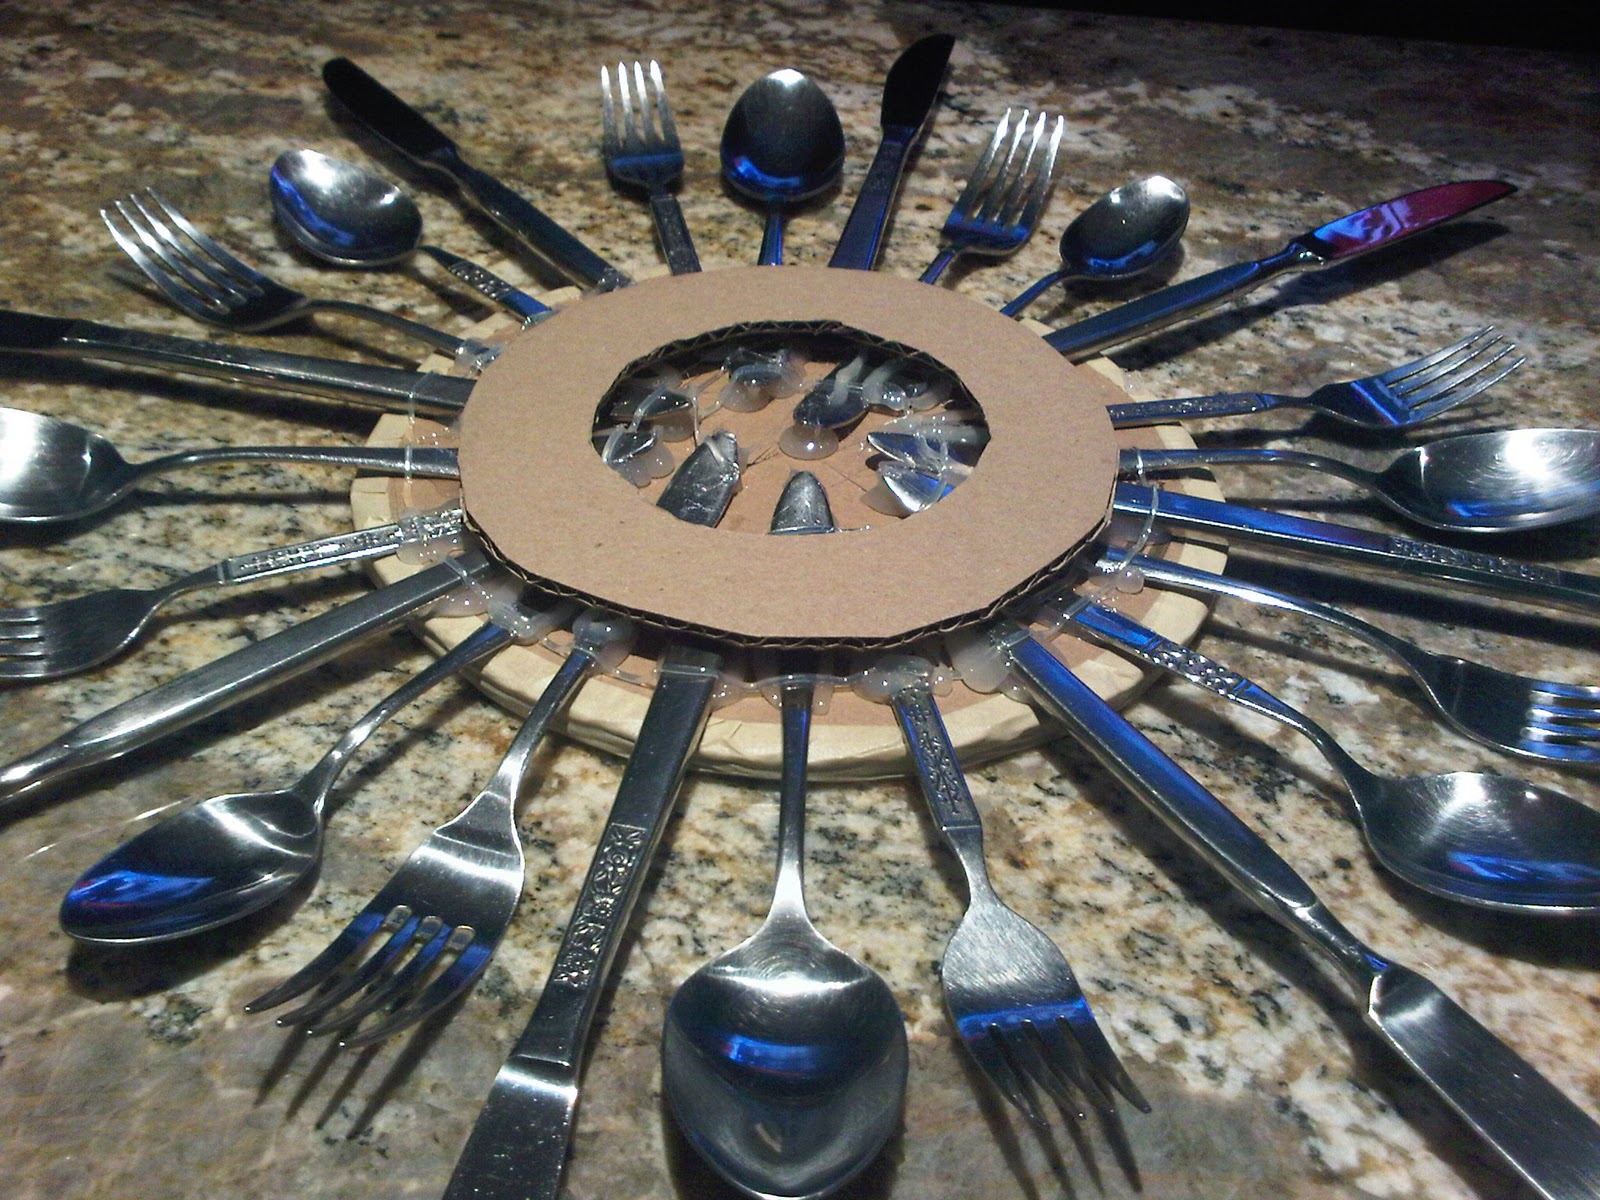

I think Richard Dean Anderson would be proud! So I glued that down and added more glue for my monogram...

FAIL..epic FAIL!! Apparently the "wood" that the monogram circle was made of didn't get along well with hot glue..what?? I though hot glue was the sh*t best!

What to do now?? Well, no turning back...the next day I went back to Class n' Trash & picked out a plate


This one was made of metal. I taped off the rim because it had a nice silver edge & I didn't want to spray paint over it. Instead of black I chose Oil Rubbed Bronze by Rust-oleum


That little wire thing is the plate hanger that I also sprayed because I don't like that you can see them against the plate once they are hung.

After the drying time, I stenciled my Z again.


and again, I pulled the stencil off too early so it got a bit messed up smudged on the top curve. Darn my impatience!

And I will admit I glued the plate onto the base before it was dry. I had already smudged it so I figured oh well...After all the set backs, I wanted this sucker up on my wall already...

and here it is...


I think it looks better than the wooden one, no?

Have you ever had an "epic fail" turn into a "better than the original"??

Oh, and in case you're wondering...this whole project only set me back a few hours and some grey hair about $7, give or take a fork or two... so thanks Allison (House of Hepworth) & Bev (Flamingo Toes). I hope I did you proud. Thanks for the inspiration

~Bernadette


Linking To:

Tuesday, March 1, 2011

Sunburst Mirror Update & a little DIY...

I did it!!

I finished the sunburst mirror and all for under my $20 goal...

the mirror was $3
the BBQ skewers were $2.15
the metallic silver spray paint by Rust-oleum was $6.99

So grand total is...$12.14!!

Pretty good, right?? I'm smiling BIG, W-I-D-E, HUGE right now... the store bought one in that size would have cost around $140, yeah, I'm happy!

and...here it is....

TADA!!!


Do you like??

I LOOOOOOOOVE!!!!

All I have to do now is hang it up over our headboard...

Speaking of headboards... here's my DIY...


I know what you're thinking...UMM, hello??? That's a door!!

Well, it used to be a door...now its a HEADBOARD!!

Want to see how???

Here we go...

First: find an old door...if you're lucky like me, it happens like this:

you 1st decide to replace your bedroom door & then DING...idea!!!

Why buy plywood or whatever when you can recycle your old door...it was the perfect width for our future king size bed...we have a queen right now...anyway

Second: you go on a seemingly endless search for fabric...have I mentioned how expensive fabric can be?? well, it can, but again if you're lucky like me, you get sick one day & when you are at Target waiting for your prescription, you run across these in the clearance aisle:

95 inch drapes in the most beautiful & velvety silver stripe...that clearance tag says $23.98, but when I reached for another drape, I found one that said $16.98...Price reduction!! SCORE!!! I bought THREE!!! (I only used 1 for the headboard)

My old door measures 30x80 so this 54x95 drape is PERFECT!!

The next thing I needed was foam & batting for my upholstered filling...that was the shocker in this whole process...I went to Joann's Fabric's in Morgan Hill & I looked at the price...$29.99 a yard!! YIKES!!!! That would have come out to more than $60!! WOW!!...foam is E.X.P.E.N.S.I.V.E!!  I quickly put it back & kept on thinkin'...it was just too much once you added in all the other things I would need...bummer, was I going to have to scrap my beautifully imagined upholstered headboard???

UGH!!!

To console myself I went to HomeGoods in Gilroy...there I found...

That's a twin sized 3 inch mattress pad. On clearance for $29!!

SCORE #2!!!!

However, I was stressed a bit because it wasn't quite long enough for my old door..the mattress pad measured 72 inches long...8 inches short! Luckily though it was 45 inches wide, so all I did was cut off some width and added it to my length...like this:


See that can of stuff in the first picture?? That's spray glue that I had from some long ago project..insert the word FREE for the price there! Always try to use what you have at home...it just makes sense..

So, looking pretty good so far, yeah??

OK, next I wrapped the foam covered door with batting..I bought one queen size quilt batting for $15.99..no clearance..darn it!


See the sneak peek of the striped drape??


I stapled the batting to the door using a staple gun borrowed from my momma. Also free (because she loves me).

Now its time to make it beautiful by wrapping it in the striped drape...I couldn't take pictures of that step because I needed both hands..in fact I needed four, so the husband had to help me with the stapling on that one...

So I ended up with...drumroll, please....

There it is...my new upholstered headboard...what do you think??

Like??

again, I have to say I LOOOOVE!!!

Now obviously, its leaning against the wall there...I needed a way to hang it...so off I went to Ace Hardware...

I bought Flush Mount Hangers for $2.97

So lets see..what did this DIY cost??

Old door: FREE
Mattress Pad: $29
Spray Glue: FREE
Batting: $15.99
Drape: $16.98
Staples: FREE
Hangers: $2.79

Grand Total: $64.76 (+tax of course)

There's that BIG, W-I-D-E, HUGE smile again!

I just painted our bedroom so I haven't hung the headboard yet...here it is wedged between the wall and the mattress

LOOOVE!!

You know, people laughed when I said I was making my own headboard...I heard a lot of REALLY?? and HOW??

Of course that only made me more determined...and I did it..I bet you could too...

~Bernadette

**UPDATE PICTURE**
Still not a great picture becasue I took it with my phone. Please ignore the messy pillows. I'm lazy I haven't changed them out yet...

Wednesday, February 23, 2011

a girl & her cold...

Hi everyone...

This girl has a cold! ugh!

I had so many plans for my February break...a whole week of DIYing and finally, finally a bedroom with color! Instead, I've been sniffling & coughing up a storm...so frustrating!

Now, normally I'd relish in the chance to stay in bed all day & have nothing to do but flip through channels or catch up on my DVR list..not this time though.

I really, really wanted to be busy...Picture it: freshly painted walls...nice, comfy "new" headboard made by yours truely, and a sunburst mirror Martha Stweart could be proud of...can you see it?? Oh, it was going to be soooo GREAT!

But, alas, in a cloud of used tissues, that vision disappeared...*sigh* (gross, I know, but to be completely honest there was only 1 used tissue & all it did was catch a sneeze)

There was however an achey body, a throbbing head, and a burning throat...so no DIY for me...

EXCEPT...You had to know that a cold couldn't keep me down the whole time...

I did manage to get started on my sunburst mirror...remember I wanted to make my own for under $20...

My inspiration...the sunburst mirror made by Michelle at "Three Men and a Lady"
(I tried to post a picture, but couldn't so, find it & a tutorial HERE)

Now remember, its not finished...I have 2 more steps to go...

Step 1: find the perfect thrift store mirror as my base


I found this mirror at "Class & Trash" on South Main Street in Salinas. It had a $4 sticker price, but since it was a little beat up, I got it for $3...I know what you're thinking..eww..wicker! yuck! Open your minds people....it gets better!

Step 2: Glue BBQ skewers (yes, BBQ skewers) to the back of the mirror...like this:


I had an open bag at home so I only had to buy 1 more pack of 100 skewers for $2.15. To attach them, I used hot glue..see my big pink gun in the background?? Isn't she cool?? lol...

Step 3: Which I haven't gotten to is to spray paint the whole thing black...don't panic!! I'm not leaving it black..that's just a base for the silver that will be the final color, but that's step 4, and we can't get there yet because

THE GIRL HAS A COLD!! ugh!!

ok, so here's hoping that next time you check back I'll have a freshly painted room & an amazing sunburst mirror to show you...

*fingers crossed*

stay healthy...
~Bernadette

Thursday, February 17, 2011

my new addiction...yes another one...

Confession time...I'm addicted to blogs..need proof?? Umm, I'm blogging about blogs! That should be proof enough...here's the thing though...I'm not ashamed.

Blogs are so great! I happened to come across the blog called "Three Men & a Lady" (check it out HERE) as I was searching for DIY items online...Michelle, the author of that blog has a beautiful home she keeps improving with great DIY projects. Well, once I read her blog, all I could think about was finding more & more & more blogs...

Now I am a subscriber to so many that my Blackberry is beeping at all hours of the night...literally...and still I'm not ashamed...if you are a DIYer or have any interest in being crafty, thrifty, creative, etc...blogs are the answer. They are so helpful. I've gotten so many ideas from them.

I'm putting some of those ideas into effect this weekend..hopefully the weather will cooperate since I need to do some spray painting...

Want a preview?? Here it is...

I've been wanting something to hang above the headboard in our bedroom...well, while searching many a blog, I found these:


SUNBURST MIRRORS!!!!!
Beautiful, gorgeous, oh so sophisticated..Sunburst mirrors!! They are everywhere! On blogs, on magazine pages, in my head...everywhere!! I want one, but...they can be a bit on the pricey side...I did see one at Target for $24.99, which wasn't bad, but it was too small....so I'm going to make my own...I love being crafty...I'm hoping the whole project comes in at under $20...wish me luck & check back to see the results...

Maybe you'll be inspired to make your own...
~Bernadette